Categoría: cosas técnicas

Posts relacionados con la programación o manejo o configuración de los oredenadores (computadores)

  • Publicada mi segunda app en la Windows Store


    Pues eso… después de casi 5 días de espera, en realidad 4 + 1, ya que en los primeros días me la rechazaron dos veces (en otro momento te comentaré las razones y cómo evitarlas antes de que ocurran) y hoy la volví a mandar y ya está publicada en la Tienda de Windows (Windows Store).


    lector Rss free en Windows Store
    Si pulsas en la imagen te llevará a la página de información y desde allí podrás entrar en la tienda de Windows, siempre que uses Internet Explorer, ya que con Chrome no va a ningún lado el enlace de "Ver en la Tienda de Windows".


    Esta es la versión gratuita, la versión de pago (que es igual que la free, pero con dos idiomas, es para que la gente que se la baje/compre pueda colaborar económicamente con mi sitio) seguramente estará disponible en unos minutos, ya que me han mandado el mensaje indicándome que está "aprobada".


    En esta página de mi sitio te pondré los enlaces a las actualizaciones que vaya haciendo y (cuando lo tenga listo) al código fuente para que te pueda servir de ayuda… ¡espero!


    Y esto es todo…


    Nos vemos.,
    Guillermo

  • Crear un SplashScreen personalizado para la Windows Store


    Pues eso… que en las aplicaciones para la Tienda de Windows te "exigen" que tengas una imagen de al menos 620×300 para usar como pantalla de presentación (splash screen) mientras la aplicación se carga.

    Si quieres poner algún texto en esa imagen, dicho texto debe ser estático, es decir, cada vez que lo cambies en realidad estarías cambiando la imagen, y lo que te voy a explicar aquí es cómo añadir textos (o cualquier otra cosa) a esa imagen de inicio, pero de forma que sólo se añada (o sea visible) mientras está cargando el programa.


    Nota:
    Este ejemplo está basado, y creo que mejorado, pero sobre todo simplificado, en los ejemplos de la MSDN / SDK:

    Cómo extender la pantalla de presentación y Directrices y lista de comprobación para pantallas de presentación, en concreto el ejemplo de C# para Evitar un parpadeo durante la transición a la pantalla de presentación extendida.


    En este ejemplo he procurado que, en modo de diseño, la imagen esté centrada y dentro de un Grid con idea de que podamos situar los textos donde queramos que estén.

    Hay que tener en cuenta que aquí estoy usando la imagen predeterminada de 620×300 pero si utilizas alguna de las otras dos, debes tenerlo en cuenta a la hora de posicionar los textos.

    He dejado la imagen predeterminada, es decir, la que utiliza el Visual Studio al crear un nuevo proyecto, por tanto, los valores de las columnas y filas del Grid puede que no sean los adecuados si tienes otra imagen.

    Lo que si es conveniente saber es que el ancho y alto de esas columnas y filas deben coincidir con el tamaño de la imagen, ya que así tendremos una visión exacta de dónde estarán posicionados las cosas que le añadamos a esa imagen de inicio.
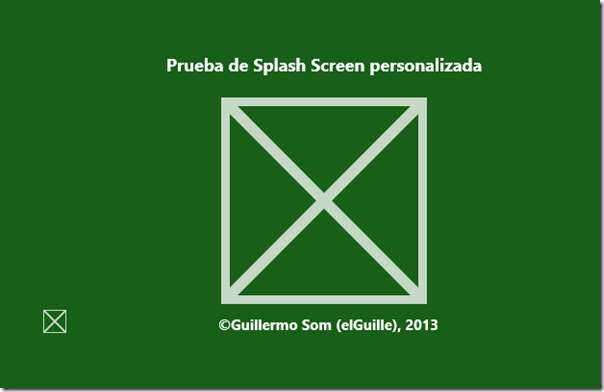
    En este ejemplo he usado el logo pequeño de la aplicación (SmallLogo.png) y un par de cajas de textos, una de ellas la modifico (si es necesario) en tiempo de ejecución.

    En la siguiente captura puedes ver cómo quedaría con el código de ejemplo usado en este artículo.


    ExtendedSplash


    Nota:
    El color de fondo de la pantalla de inicio y de la aplicación deberían coincidir con el indicado en el manifiesto de la aplicación (Package.appxmanifest), ya que si no… pues… lo mismo no queda bien.
    Fíjate que en el manifiesto de la aplicación hay dos definiciones de colores, uno para las imágenes "normales" (los logos) y otro para la pantalla de inicio (Splash screen). Yo los he puesto todos (también el de MainPage) con el mismo color verde: #185F18.


    Vamos a ver el código XAML de la página/control que hará de pantalla de inicio en este ejemplo.


    Código Xaml El código Xaml
    <Grid
        x:Class="Splash_Screen.ExtendedSplash"
        xmlns="http://schemas.microsoft.com/winfx/2006/xaml/presentation"
        xmlns:x="http://schemas.microsoft.com/winfx/2006/xaml"
        xmlns:d="http://schemas.microsoft.com/expression/blend/2008"
        xmlns:mc="http://schemas.openxmlformats.org/markup-compatibility/2006"
        xmlns:local="using:Splash_Screen"
        mc:Ignorable="d"
        Background="#185F18">
    
        <!-- la imagen tiene 620 x 300 -->
        <Canvas MaxHeight="300" MaxWidth="620">
            <Grid>
                <Grid.RowDefinitions>
                    <RowDefinition Height="35" />
                    <RowDefinition Height="225" />
                    <RowDefinition Height="40" />
                </Grid.RowDefinitions>
                <Grid.ColumnDefinitions>
                    <ColumnDefinition Width="60"/>
                    <ColumnDefinition Width="140"/>
                    <ColumnDefinition Width="420"/>
                </Grid.ColumnDefinitions>
    
                <Image x:Name="extendedSplashImage" Grid.Row="0" Grid.Column="0"
                       Grid.RowSpan="4" Grid.ColumnSpan="4" 
                       Margin="0" Source="///Assets/SplashScreen.png" 
                       ImageOpened="extendedSplashImage_ImageOpened"/>
                <TextBlock x:Name="txtTitulo" x:Uid="txtTitle" 
                           Grid.Row="0" Grid.Column="0" Grid.ColumnSpan="3"
                           Foreground="White" FontSize="18" FontWeight="Bold" 
                           HorizontalAlignment="Center"
                           Text="Prueba de Splash Screen personalizada" />
                <TextBlock x:Name="txtCopyr" Grid.Row="2" Grid.Column="2" 
                           Foreground="White" FontSize="15" FontWeight="Bold" 
                           Margin="0,10,0,0"
                           Text="©Guillermo Som (elGuille), 2013" />
                <Image Grid.Row="2" Grid.Column="0" Grid.RowSpan="2"
                       Height="30" Width="30" Stretch="Uniform" 
                       Source="///Assets/SmallLogo.png" Margin="0,0,0,10"  Opacity="100" />
            </Grid>
        </Canvas>
    </Grid> 


    Nota sobre las tres /// que hay delante de la carpeta en la que están las imágenes:

    Esas tres barras indican que es desde el directorio base de la aplicación, de esa forma, si mueves este fichero de la Splash screen a otra carpeta no tendrás que hacer cambios para indicar la ruta de las imágenes.


    Ahora veamos el código de esa página, como verás hay dos constructores, pero nosotros solo usaremos el que recibe dos parámetros.


    Código para Visual Basic.NET (VB.NET) El código para Visual Basic .NET
    '------------------------------------------------------------------------------
    ' ExtendedSplash                                                    (19/Ene/13)
    ' Usar un SplashScreen personalizado
    '
    ' Basado en un ejemplo de la MSDN (y creo que mejorado y simplificado)
    ' Sólo hay que modificar App.OnLaunched
    '
    ' Cómo extender la pantalla de presentación
    ' http://msdn.microsoft.com/es-es/library/windows/apps/xaml/hh868191.aspx
    ' y Directrices y lista de comprobación para pantallas de presentación para
    ' Evitar un parpadeo durante la transición a la pantalla de presentación extendida
    ' http://msdn.microsoft.com/es-es/library/windows/apps/hh465338.aspx#ts_flicker_cs
    '
    '
    ' ©Guillermo 'guille' Som, 2013
    '------------------------------------------------------------------------------
    
    Imports System
    Imports Windows.ApplicationModel.Activation
    Imports Windows.Foundation
    Imports Windows.UI.Core
    Imports Windows.UI.Xaml
    Imports Windows.UI.Xaml.Controls
    
    Partial Class ExtendedSplash
        ' Rect to store splash screen image coordinates. 
        Friend splashImageRect As Rect
        ' Variable to track splash screen dismissal status. 
        Friend dismissed As Boolean = False
        ' Variable to hold the splash screen object. 
        Private splash As SplashScreen
    
        Friend rootFrame As Frame
    
    
        Private showWindowTimer As DispatcherTimer
        Private showWindowTimerNum As Integer = 0
    
        Private Sub OnShowWindowTimer(sender As Object, e As Object)
            showWindowTimerNum += 1
    
            If showWindowTimerNum = 1 Then
                ' Activate/show the window, now that the splash image has rendered
                Window.Current.Activate()
    
                ' aquí hacemos un pequeño descanso antes de mostrar
                ' la página principal
            ElseIf showWindowTimerNum >= 50 Then
                showWindowTimer.Stop()
                cargarMainPage()
            End If
    
        End Sub
    
        Private Sub extendedSplashImage_ImageOpened(sender As Object, e As RoutedEventArgs)
            ' ImageOpened means the file has been read, but the image hasn't been painted yet.
            ' Start a short timer to give the image a chance to render, before showing the window
            ' and starting the animation.
            showWindowTimer = New DispatcherTimer()
            showWindowTimer.Interval = TimeSpan.FromMilliseconds(50)
            AddHandler showWindowTimer.Tick, AddressOf OnShowWindowTimer
            showWindowTimer.Start()
    
        End Sub
    
        Public Sub New()
    
            ' This call is required by the designer.
            InitializeComponent()
    
            ' Add any initialization after the InitializeComponent() call.
    
        End Sub
    
        ''' <summary> 
        ''' Constructor with splash screen information 
        ''' </summary> 
        Public Sub New(splashscreen As SplashScreen, loadState As Boolean)
            InitializeComponent()
    
            If DateTime.Now.Year > 2013 Then
                txtCopyr.Text = "©Guillermo Som (elGuille), 2013-" & DateTime.Now.Year.ToString
            End If
    
            ' Listen for window resize events to reposition the extended splash screen image accordingly. 
            ' This is important to ensure that the extended splash screen is formatted properly in response to
            ' snapping, unsnapping, rotation, etc... 
            AddHandler Window.Current.SizeChanged, AddressOf ExtendedSplash_OnResize
    
            splash = splashscreen
    
            If splash IsNot Nothing Then
                ' Register an event handler to be executed when the splash screen has been dismissed. 
                AddHandler splash.Dismissed, AddressOf DismissedEventHandler
    
                ' Retrieve the window coordinates of the splash screen image. 
                splashImageRect = splash.ImageLocation
                PositionImage()
            End If
    
            ' Create a Frame to act as the navigation context  
            rootFrame = New Frame()
    
            '' Restore the saved session state if necessary 
            'RestoreStateAsync(loadState)
    
    
        End Sub
    
        'Public Async Sub RestoreStateAsync(loadState As Boolean)
        '    If loadState Then
        '        Await SuspensionManager.RestoreAsync()
        '    End If
        '    ' Normally you should start the time consuming task asynchronously here and  
        '    ' dismiss the extended splash screen in the completed handler of that task 
        '    ' This sample dismisses extended splash screen in the handler for "Learn More" button for demonstration 
        'End Sub
    
        ' Position the extended splash screen image in the same location as the system splash screen image. 
        Private Sub PositionImage()
            extendedSplashImage.SetValue(Canvas.LeftProperty, splashImageRect.X)
            extendedSplashImage.SetValue(Canvas.TopProperty, splashImageRect.Y)
    
            extendedSplashImage.Height = splashImageRect.Height
            extendedSplashImage.Width = splashImageRect.Width
        End Sub
    
        Private Sub ExtendedSplash_OnResize(sender As Object, e As WindowSizeChangedEventArgs)
            ' Safely update the extended splash screen image coordinates.
            ' This function will be fired in response to snapping, unsnapping, rotation, etc... 
            If splash IsNot Nothing Then
                ' Update the coordinates of the splash screen image. 
                splashImageRect = splash.ImageLocation
                PositionImage()
            End If
        End Sub
    
        Private Sub cargarMainPage()
            ' Navigate to MainPage 
            rootFrame.Navigate(GetType(MainPage))
    
            '' Set extended splash info on Main Page 
            'DirectCast(rootFrame.Content, MainPage).SetExtendedSplashInfo(splashImageRect, dismissed)
    
            ' Place the frame in the currrent window 
            Window.Current.Content = rootFrame
    
        End Sub
    
        ' Include code to be executed when the system has transitioned from the splash screen to the extended splash screen (application's first view). 
        Private Sub DismissedEventHandler(sender As SplashScreen, e As Object)
            dismissed = True
    
            ' Navigate away from the app's extended splash screen after completing setup operations here... 
            ' This sample navigates away from the extended splash screen when the "Learn More" button is clicked. 
        End Sub
    End Class


    Código para C Sharp (C#) El código para C#
    //-----------------------------------------------------------------------------
    // ExtendedSplash                                                   (19/Ene/13)
    // Usar un SplashScreen personalizado
    //
    // Basado en un ejemplo de la MSDN (y creo que mejorado y simplificado)
    // Sólo hay que modificar App.OnLaunched
    //
    // Cómo extender la pantalla de presentación
    // http://msdn.microsoft.com/es-es/library/windows/apps/xaml/hh868191.aspx
    // y Directrices y lista de comprobación para pantallas de presentación para
    // Evitar un parpadeo durante la transición a la pantalla de presentación extendida
    // http://msdn.microsoft.com/es-es/library/windows/apps/hh465338.aspx#ts_flicker_cs
    //
    //
    // ©Guillermo 'guille' Som, 2013
    //------------------------------------------------------------------------------
    
    using System;
    using Windows.ApplicationModel.Activation;
    using Windows.Foundation;
    using Windows.UI.Core;
    using Windows.UI.Xaml;
    using Windows.UI.Xaml.Controls;
    
    namespace Splash_Screen
    {
        /// <summary>
        /// An empty page that can be used on its own or navigated to within a Frame.
        /// </summary>
        public sealed partial class ExtendedSplash : Grid
        {
            public ExtendedSplash()
            {
                this.InitializeComponent();
            }
    
            /// <summary>
            /// Constructor with splash screen information
            /// </summary>
            public ExtendedSplash(SplashScreen splashscreen, bool loadState)
            {
                InitializeComponent();
    
                //
                // Aquí pondremos lo que haya que actualizar en los textos
                //
                if (DateTime.Now.Year > 2013)
                {
                    txtCopyr.Text = "©Guillermo Som (elGuille), 2013-" + DateTime.Now.Year.ToString();
                }
    
                // Listen for window resize events to reposition the extended splash screen image accordingly.
                // This is important to ensure that the extended splash screen is formatted properly in response to
                // snapping, unsnapping, rotation, etc...
                Window.Current.SizeChanged += ExtendedSplash_OnResize;
    
                splash = splashscreen;
    
                if (splash != null)
                {
                    // Register an event handler to be executed when the splash screen has been dismissed.
                    splash.Dismissed += DismissedEventHandler;
    
                    // Retrieve the window coordinates of the splash screen image.
                    splashImageRect = splash.ImageLocation;
                    PositionImage();
                }
    
                // Create a Frame to act as the navigation context
                rootFrame = new Frame();
    
                // Restore the saved session state if necessary
                //RestoreStateAsync(loadState);
    
    
            }
            
            //async void RestoreStateAsync(bool loadState)
            //{
            //    if (loadState)
            //        await SuspensionManager.RestoreAsync();
    
            //    // Normally you should start the time consuming task asynchronously here and  
            //    // dismiss the extended splash screen in the completed handler of that task 
            //    // This sample dismisses extended splash screen  in the handler for "Learn More" button for demonstration 
            //} 
    
    
            // Rect to store splash screen image coordinates.
            internal Rect splashImageRect;
    
            // Variable to track splash screen dismissal status.
            internal bool dismissed = false;
    
            // Variable to hold the splash screen object.
            private SplashScreen splash;
    
            internal Frame rootFrame;
    
    
            private DispatcherTimer showWindowTimer;
            private int showWindowTimerNum = 0;
    
            private void OnShowWindowTimer(object sender, object e)
            {
                showWindowTimerNum += 1;
    
                if (showWindowTimerNum == 1)
                {
                    // Activate/show the window, now that the splash image has rendered
                    Window.Current.Activate();
                }
                // aquí hacemos un pequeño descanso antes de mostrar
                // la página principal
                else if (showWindowTimerNum >= 50)
                {
                    showWindowTimer.Stop();
                    cargarMainPage();
                }
            }
    
            private void extendedSplashImage_ImageOpened(object sender, RoutedEventArgs e)
            {
                // ImageOpened means the file has been read, but the image hasn't been painted yet.
                // Start a short timer to give the image a chance to render, before showing the window
                // and starting the animation.
                showWindowTimer = new DispatcherTimer();
                showWindowTimer.Interval = TimeSpan.FromMilliseconds(50);
                showWindowTimer.Tick += OnShowWindowTimer;
                showWindowTimer.Start();
            }
    
            // Position the extended splash screen image in the same location as the system splash screen image.
            private void PositionImage()
            {
                extendedSplashImage.SetValue(Canvas.LeftProperty, splashImageRect.X);
                extendedSplashImage.SetValue(Canvas.TopProperty, splashImageRect.Y);
    
                extendedSplashImage.Height = splashImageRect.Height;
                extendedSplashImage.Width = splashImageRect.Width;
            }
    
            private void ExtendedSplash_OnResize(object sender, WindowSizeChangedEventArgs e)
            {
                // Safely update the extended splash screen image coordinates.
                // This function will be fired in response to snapping, unsnapping, rotation, etc...
                if (splash != null)
                {
                    // Update the coordinates of the splash screen image.
                    splashImageRect = splash.ImageLocation;
                    PositionImage();
                }
            }
    
            private void cargarMainPage()
            {
                // Navigate to MainPage
                rootFrame.Navigate(typeof(MainPage));
    
                // Set extended splash info on Main Page
                //(rootFrame.Content as MainPage).SetExtendedSplashInfo(splashImageRect, dismissed);
    
                // Place the frame in the currrent window
                Window.Current.Content = rootFrame;
            }
    
            // Include code to be executed when the system has transitioned 
            // from the splash screen to the extended splash screen (application's first view).
            private void DismissedEventHandler(SplashScreen sender, object e)
            {
                dismissed = true;
    
                // Navigate away from the app's extended splash screen after completing setup operations here...
                // This sample navigates away from the extended splash screen when the "Learn More" button is clicked.
            }  
        }
    }


    Ahora sólo falta modificar el código de App.xaml, concretamente el método OnLaunched para que muestre nuestra página de inicio en lugar de MainPage (desde el código de ExtendedSplash nos encargamos de mostrar esa página cuando se ha terminado de mostrar.


    Aquí tienes el código de VB y el de C# del método OnLaunched de la clase App:

    Visual Basic:

    Protected Overrides Sub OnLaunched(args As Windows.ApplicationModel.Activation.LaunchActivatedEventArgs)
    
        ' Para usar el SplashScreen personalizado                   (07/Ene/13)
        If args.PreviousExecutionState <> ApplicationExecutionState.Running Then
            Dim loadState As Boolean = (args.PreviousExecutionState = ApplicationExecutionState.Terminated)
            Dim extendedSplash As ExtendedSplash = New ExtendedSplash(args.SplashScreen, loadState)
            Window.Current.Content = extendedSplash
    
            ' ExtendedSplash will activate the window when its initial content has been painted.
    
            ' Salir
            Exit Sub
        End If
    
    
        Dim rootFrame As Frame = TryCast(Window.Current.Content, Frame)
    
        ' Do not repeat app initialization when the Window already has content,
        ' just ensure that the window is active
    
        If rootFrame Is Nothing Then
            ' Create a Frame to act as the navigation context and navigate to the first page
            rootFrame = New Frame()
            If args.PreviousExecutionState = ApplicationExecutionState.Terminated Then
                ' TODO: Load state from previously suspended application
            End If
            ' Place the frame in the current Window
            Window.Current.Content = rootFrame
        End If
        If rootFrame.Content Is Nothing Then
            ' When the navigation stack isn't restored navigate to the first page,
            ' configuring the new page by passing required information as a navigation
            ' parameter
            If Not rootFrame.Navigate(GetType(MainPage), args.Arguments) Then
                Throw New Exception("Failed to create initial page")
            End If
        End If
    
        ' Ensure the current window is active
        Window.Current.Activate()
    End Sub


    C#:

    protected override void OnLaunched(LaunchActivatedEventArgs args)
    {
        // Para usar el SplashScreen personalizado              (07/Ene/13)
        if (args.PreviousExecutionState != ApplicationExecutionState.Running)
        {
            bool loadState = (args.PreviousExecutionState == ApplicationExecutionState.Terminated);
            ExtendedSplash extendedSplash = new ExtendedSplash(args.SplashScreen, loadState);
            Window.Current.Content = extendedSplash;
    
            // ExtendedSplash will activate the window when its initial content has been painted.
    
            // Salir
            return;
        }
        
    
        Frame rootFrame = Window.Current.Content as Frame;
    
        // Do not repeat app initialization when the Window already has content,
        // just ensure that the window is active
        if (rootFrame == null)
        {
            // Create a Frame to act as the navigation context and navigate to the first page
            rootFrame = new Frame();
    
            if (args.PreviousExecutionState == ApplicationExecutionState.Terminated)
            {
                //TODO: Load state from previously suspended application
            }
    
            // Place the frame in the current Window
            Window.Current.Content = rootFrame;
        }
    
        if (rootFrame.Content == null)
        {
            // When the navigation stack isn't restored navigate to the first page,
            // configuring the new page by passing required information as a navigation
            // parameter
            if (!rootFrame.Navigate(typeof(MainPage), args.Arguments))
            {
                throw new Exception("Failed to create initial page");
            }
        }
        // Ensure the current window is active
        Window.Current.Activate();
    }


    Ya solo quedaría hacer algo en MainPage, pero ahí haz lo que quieras, ya que no hace falta añadir ningún código para esto de mostrar la SplashScreen. Es decir, en esa página añade las cosas que tu aplicación tendrá que hacer.

    Y si en lugar de usar MainPage utilizas cualquiera de las otras páginas usadas en los ejemplos de Visual Studio, acuérdate de cambiar el nombre de esa página por la que corresponda en el método que te acabo de mostrar de la clase App y también en el método cargarMainPage de ExtendedSplash.


    Espero que te sirva para personalizar mejor tus aplicaciones para la Tienda de Windows 😉


    Nos vemos.

    Guillermo

  • Ejemplo sencillo de notificaciones (toast) para Windows Store


    Pues eso… que aunque aún no son horas de toastar nada, pero te voy a poner un par de ejemplos (o uno solo) de cómo mostrar las notificaciones del sistema (toast notifications), que no son otra cosa que los mensajes (o notificaciones) que aparecen en los laterales de la parte superior de la pantalla de Windows (ver la figura 1).


    toast01
    Figura 1.


    En principio este tipo de notificaciones están pensadas para eso, notificar al usuario de algo en un momento concreto (ahora te explico esto), pero sobre todo, que el usuario se entere de que eso está ocurriendo (lo están avisando), así que… este tipo de notificaciones se mostrarán siempre encima de lo que haya en ese momento en la pantalla… y cuando digo pantalla me refiero a la pantalla tanto de inicio de Windows 8 como a la "pantalla del escritorio".


    Lo del par de ejemplos que te comentaba antes es porque hay dos formas de notificar (o mostrar las notificaciones). Una es de forma inmediata, es decir: ¡ya!. La otra es para que se muestre en el momento que indiquemos, ya sean unos segundos después o más tiempo… no sé exactamente cuanto tiempo, pero incluso días y meses después. La tercera (sí, ya se que te dije que había dos, pero…) es una especie de variación de la segunda, ya que también se puede indicar la periodicidad de dicha notificación (si se repite, etc.)

    Es decir, que hay muchas posibilidades de usar las notificaciones del sistema (o toast notifications), así que, si además de lo que te explique aquí quieres saber más: Introducción a las notificaciones del sistema (Toast notification overview)


    Lo primero que debes saber es que esto es para usarlo en las aplicaciones de Windows Store y que en el manifiesto de la aplicación tienes que indicar que quieres usar este tipo de notificaciones.

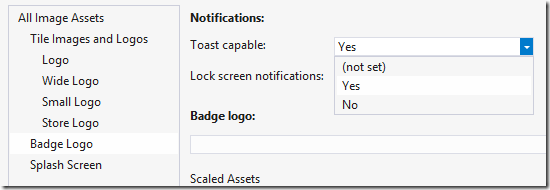
    Abre el fichero Package.appxmanifest y en la primera ficha (Application UI) en la lista de las imágenes busca Badge Logo y selecciónala, en la parte de la derecha tendrás las opciones de notificaciones (notifications) en la lista Toast capable selecciona Yes tal como puedes ver en la figura 2.
    De no hacerlo, las notificaciones simplemente ¡¡¡ NO APARECERÁN !!!
     

    toast03
    Figura 2


    Una vez que tenemos esto, vamos a ver el código (en principio de Visual Basic, ya también el de C# o lo pongo más tarde o te pongo un enlace a Pastebin para cuando esté listo), de todas formas, los que usáis C# no os podéis quejar mucho, ya que la mayoría de los ejemplos de la documentación y otros sitios web están en C#, algo que no es tan habitual para los que prefieren usar Visual Basic, en fin…


    Los pasos a seguir:

    Crea un proyecto para la tienda de Windows (yo he creado el m´s básico).

    Abre el fichero del manifiesto de la aplicación (Package.appxmanifest) y selecciona Yes en Toast capable (ver figura 2).

    En MainPage.xaml vamos a crear una barra de aplicación (AppBar) con tres botones.
    El diseño de esos botones los tomaremos del fichero StandardStyles.xaml (en la carpeta Common), pero como quiero cambiarles el texto para que me lo muestre en castellano, los he copiado y pegado en los recursos de la página (cambiándoles el nombre para que no haya conflictos, aunque en esta caso no los habría ya que los botones del fichero StandarStyles suelen estar comentados, al menos en la plantilla de las aplicaciones básicas.

    Esos tres botones usarán distintos tipos de notificaciones, con idea de que sepas manejarte con varias de las posibilidades que tiene esto de los "toast notifications".

    El primer botón envía una notificación inmediata usando un periodo largo, es decir, la notificación tardará más de lo habitual en quitarse, también está desactivado el audio (es una notificación silenciosa y de larga duración, jeje).

    Al pulsar en el segundo botón mostrará una notificación a los 3 segundos y esta si que será con sonido y de duración normal.

    El tercer botón se notificará de forma inmediata y otra más a los 10 segundos, ambas serán de larga duración y con sonido.


    Aquí tienes una captura en pleno funcionamiento:


    toast05
    Figura 3. La aplicación en funcionamiento


    Este es el código XAML completo, con la definición de los estilos de los tres botones.


    <Page
        x:Class="Toast_notifications.MainPage"
        xmlns="http://schemas.microsoft.com/winfx/2006/xaml/presentation"
        xmlns:x="http://schemas.microsoft.com/winfx/2006/xaml"
        xmlns:local="using:Toast_notifications"
        xmlns:d="http://schemas.microsoft.com/expression/blend/2008"
        xmlns:mc="http://schemas.openxmlformats.org/markup-compatibility/2006"
        mc:Ignorable="d">
    
        <Page.Resources>
            <Style x:Key="PlayEsAppBarButtonStyle" TargetType="ButtonBase" 
                   BasedOn="{StaticResource AppBarButtonStyle}">
                <Setter Property="AutomationProperties.AutomationId" Value="PlayAppBarButton"/>
                <Setter Property="AutomationProperties.Name" Value="Inmediato"/>
                <Setter Property="Content" Value="&#xE102;"/>
            </Style>
    
            <Style x:Key="HelpEsAppBarButtonStyle" TargetType="ButtonBase" 
                   BasedOn="{StaticResource AppBarButtonStyle}">
                <Setter Property="AutomationProperties.AutomationId" Value="HelpAppBarButton"/>
                <Setter Property="AutomationProperties.Name" Value="Ayuda"/>
                <Setter Property="Content" Value="&#xE11B;"/>
            </Style>
            <Style x:Key="ClockEsAppBarButtonStyle" TargetType="ButtonBase" 
                   BasedOn="{StaticResource AppBarButtonStyle}">
                <Setter Property="AutomationProperties.AutomationId" Value="ClockAppBarButton"/>
                <Setter Property="AutomationProperties.Name" Value="Programado"/>
                <Setter Property="Content" Value="&#xE121;"/>
            </Style>
        </Page.Resources>
        
        <Page.BottomAppBar>
            <AppBar x:Name="bottomAppBar1" Padding="10,0,10,0">
                <Grid>
                    <StackPanel Orientation="Horizontal" HorizontalAlignment="Left">
                        <Button Style="{StaticResource PlayEsAppBarButtonStyle}" 
                                Click="ButtonPlay_Click" />
                        <Button Style="{StaticResource ClockEsAppBarButtonStyle}" 
                                Click="ButtonClock_Click" />
                    </StackPanel>
                    <StackPanel Orientation="Horizontal" HorizontalAlignment="Right">
                        <Button Style="{StaticResource HelpEsAppBarButtonStyle}" 
                                Click="ButtonHelp_Click" />
                    </StackPanel>
                    
                </Grid>
            </AppBar>
        </Page.BottomAppBar>
        <Grid Background="{StaticResource ApplicationPageBackgroundThemeBrush}">
            <Grid.RowDefinitions>
                <RowDefinition Height="80" />
                <RowDefinition />
            </Grid.RowDefinitions>
    
            <!-- El título de la página -->
            <Grid>
                <Grid.ColumnDefinitions>
                    <ColumnDefinition Width="120"/>
                    <ColumnDefinition Width="*" />
                    <ColumnDefinition Width="Auto"/>
                </Grid.ColumnDefinitions>
                <TextBlock x:Name="pageTitle" Grid.Column="1" Text="Prueba de toast notifications" 
                           IsHitTestVisible="false" 
                           Style="{StaticResource PageHeaderTextStyle}" />
                <Image x:Name="imgLogo" Grid.Column="2" Margin="10" 
                       Source="///Assets/SmallLogo.png" Stretch="Uniform" />
            </Grid>
    
        </Grid>
    </Page>


    Y este es el código de los tres botones Visual Basic:

    Primero te pongo las dos importaciones que hay que añadir:


    Imports Windows.UI.Notifications
    Imports Windows.Data.Xml.Dom


    Y este es el código de los tres botones, las explicaciones están en los comentarios.


    Private Sub ButtonPlay_Click(sender As Object, e As RoutedEventArgs)
    
        ' La plantilla a usar, esta Text03 es:
        ' un texto de cabecera que puede ocupar dos líneas y una línea de texto normal
        Dim toastTemplate As ToastTemplateType = ToastTemplateType.ToastText03
        ' Asignamos el template a un documento Xml
        Dim toastXml As XmlDocument = ToastNotificationManager.GetTemplateContent(toastTemplate)
    
        ' El texto para el primero elemento de la pantilla
        Dim toastTextElements As XmlNodeList = toastXml.GetElementsByTagName("text")
        toastTextElements(0).AppendChild(toastXml.CreateTextNode("Cargando ..."))
    
        ' Si queremos que la duración sea larga
        ' Puede ser corta o larga, corta es la predeterminada
        Dim toastNode As IXmlNode = toastXml.SelectSingleNode("/toast")
        TryCast(toastNode, XmlElement).SetAttribute("duration", "long")
    
        ' Si queremos quitar el sonido
        ' (o indicar alguno en particular)
        ' tenemos que usar el elemento "audio"
        'Dim toastNode As IXmlNode = toastXml.SelectSingleNode("/toast")
        Dim audio As XmlElement = toastXml.CreateElement("audio")
        audio.SetAttribute("silent", "true")
        toastNode.AppendChild(audio)
    
    
        Dim toast As New ToastNotification(toastXml)
        ToastNotificationManager.CreateToastNotifier().Show(toast)
    End Sub
    
    Private Sub ButtonClock_Click(sender As Object, e As RoutedEventArgs)
    
        ' La plantilla a usar, esta Text03 es:
        ' un texto de cabecera que puede ocupar dos líneas y una línea de texto normal
        Dim toastTemplate As ToastTemplateType = ToastTemplateType.ToastText03
        ' Asignamos el template a un documento Xml
        Dim toastXml As XmlDocument = ToastNotificationManager.GetTemplateContent(toastTemplate)
    
        ' El texto para el primero elemento de la pantilla
        Dim toastTextElements As XmlNodeList = toastXml.GetElementsByTagName("text")
        toastTextElements(0).AppendChild(
            toastXml.CreateTextNode("A los 3 segundos después de haber pulsado en el botón."))
        toastTextElements(1).AppendChild(
            toastXml.CreateTextNode("Segundo texto."))
    
        ' Esto es para indicar que esta notificación se hará en el momento indicado
        Dim dueTime As DateTime = DateTime.Now.AddSeconds(3)
        Dim scheduledToast As New ScheduledToastNotification(toastXml, dueTime)
    
        ToastNotificationManager.CreateToastNotifier().AddToSchedule(scheduledToast)
    
    End Sub
    
    Private Sub ButtonHelp_Click(sender As Object, e As RoutedEventArgs)
        ' La plantilla a usar, esta Text02 es:
        ' un texto de cabecera y un texto normal que puede ocupar dos líneas
        Dim toastTemplate As ToastTemplateType = ToastTemplateType.ToastText02
        ' Asignamos el template a un documento Xml
        Dim toastXml As XmlDocument = ToastNotificationManager.GetTemplateContent(toastTemplate)
    
        ' El texto para el primero elemento de la pantilla
        Dim toastTextElements As XmlNodeList = toastXml.GetElementsByTagName("text")
        toastTextElements(0).AppendChild(
            toastXml.CreateTextNode("Esto se mostrará durante más tiempo ..."))
        toastTextElements(1).AppendChild(
            toastXml.CreateTextNode("Siempre puedes cerrar las notificaciones en la X superior."))
    
        ' Si queremos que la duración sea larga
        ' Puede ser corta o larga, corta es la predeterminada
        Dim toastNode As IXmlNode = toastXml.SelectSingleNode("/toast")
        TryCast(toastNode, XmlElement).SetAttribute("duration", "long")
    
        ' Esto es para indicar que esta notificación se hará en el momento indicado
        Dim dueTime As DateTime = DateTime.Now.AddSeconds(10)
        Dim scheduledToast As New ScheduledToastNotification(toastXml, dueTime)
    
        ToastNotificationManager.CreateToastNotifier().AddToSchedule(scheduledToast)
    
        Dim toast As New ToastNotification(toastXml)
        ToastNotificationManager.CreateToastNotifier().Show(toast)


    Ese es el código para C# (no he tardado tanto, ¿verdad? son las 06.35 y lo publiqué a eso de las 6.05)


    Añade estas dos importaciones:


    using Windows.UI.Notifications;
    using Windows.Data.Xml.Dom;


    private void ButtonPlay_Click(object sender, RoutedEventArgs e)
    {
        // La plantilla a usar, esta Text03 es:
        // un texto de cabecera que puede ocupar dos líneas y una línea de texto normal
        ToastTemplateType toastTemplate = ToastTemplateType.ToastText03;
    
        // Asignamos el template a un documento Xml
        XmlDocument toastXml = ToastNotificationManager.GetTemplateContent(toastTemplate);
    
        // El texto para el primer elemento de la pantilla
        XmlNodeList toastTextElements = toastXml.GetElementsByTagName("text");
        toastTextElements[0].AppendChild(toastXml.CreateTextNode("Cargando ..."));
    
        // Si queremos que la duración sea larga
        // Puede ser corta o larga, corta es la predeterminada
        IXmlNode toastNode = toastXml.SelectSingleNode("/toast");
        ((XmlElement)toastNode).SetAttribute("duration", "long");
    
        // Si queremos quitar el sonido
        // (o indicar alguno en particular)
        // tenemos que usar el elemento "audio"
        // IXmlNode toastNode = toastXml.SelectSingleNode("/toast");
        XmlElement audio = toastXml.CreateElement("audio");
        audio.SetAttribute("silent", "true");
        toastNode.AppendChild(audio);
    
        ToastNotification toast = new ToastNotification(toastXml);
        ToastNotificationManager.CreateToastNotifier().Show(toast);
    }
    
    private void ButtonClock_Click(object sender, RoutedEventArgs e)
    {
        // La plantilla a usar, esta Text03 es:
        // un texto de cabecera que puede ocupar dos líneas y una línea de texto normal
        ToastTemplateType toastTemplate = ToastTemplateType.ToastText03;
    
        // Asignamos el template a un documento Xml
        XmlDocument toastXml = ToastNotificationManager.GetTemplateContent(toastTemplate);
    
        // El texto para el primer elemento de la pantilla
        XmlNodeList toastTextElements = toastXml.GetElementsByTagName("text");
        toastTextElements[0].AppendChild(
            toastXml.CreateTextNode("A los 3 segundos después de haber pulsado en el botón."));
        toastTextElements[1].AppendChild(
            toastXml.CreateTextNode("Segundo texto."));
    
        // Esto es para indicar que esta notificación se hará en el momento indicado
        DateTime dueTime = DateTime.Now.AddSeconds(3);
        ScheduledToastNotification scheduledToast = new ScheduledToastNotification(toastXml, dueTime);
    
        ToastNotificationManager.CreateToastNotifier().AddToSchedule(scheduledToast);
    }
    
    private void ButtonHelp_Click(object sender, RoutedEventArgs e)
    {
        // La plantilla a usar, esta Text02 es:
        // un texto de cabecera y un texto normal que puede ocupar dos líneas
        ToastTemplateType toastTemplate = ToastTemplateType.ToastText02;
        // Asignamos el template a un documento Xml
        XmlDocument toastXml = ToastNotificationManager.GetTemplateContent(toastTemplate);
    
        // El texto para el primero elemento de la pantilla
        XmlNodeList toastTextElements = toastXml.GetElementsByTagName("text");
        toastTextElements[0].AppendChild(
            toastXml.CreateTextNode("Esto se mostrará durante más tiempo ..."));
        toastTextElements[1].AppendChild(
            toastXml.CreateTextNode("Siempre puedes cerrar las notificaciones en la X superior."));
    
        // Si queremos que la duración sea larga
        // Puede ser corta o larga, corta es la predeterminada
        IXmlNode toastNode = toastXml.SelectSingleNode("/toast");
        (toastNode as XmlElement).SetAttribute("duration", "long");
    
        // Esto es para indicar que esta notificación se hará en el momento indicado
        DateTime dueTime = DateTime.Now.AddSeconds(10);
        ScheduledToastNotification scheduledToast = new ScheduledToastNotification(toastXml, dueTime);
    
        ToastNotificationManager.CreateToastNotifier().AddToSchedule(scheduledToast);
    
        ToastNotification toast = new ToastNotification(toastXml);
        ToastNotificationManager.CreateToastNotifier().Show(toast);
    }


    Como comentario adicional, decirte que podemos "detener" una notificación si tenemos a nuestra disposición el objeto con la que se creó, ya que para detenerla tenemos que usar el método Hide de la función compartida CreateToastNotifier. A ese método Hide le tenemos que pasar una referencia al objeto que queremos detener. Yo esto lo he usado en la aplicación que he mandado a la tienda de Windows, en la que muestro la notificación mientras se carga una página web en el control WebView y la oculto cuando dicha página se ha terminado de cargar o lo que es lo mismo, intercepto el evento LoadComplete del control WebView, y ahí es donde quito la notificación.

    Como es natural, el objeto "toast" usado para esa notificación no puede estar definido dentro de un sub, ya que así no sería accesible desde otra parte del código. Por tanto, en ese caso, el objeto toast usado para poder ocultarlo cuando queramos, lo tendríamos que definir fuera de cualquier método.


    Espero que todo esto te sea de utilidad y para los que prefieren el C#, dadme unos minutos a que cree el proyecto en ese lenguaje y convierta el código, lo tacho porque ya está publicado.


    Nos vemos.

    Guillermo